Thursday, July 9, 2015

Using HAProxy as a reverse proxy for AWS microservices

Amazon's EC2 micro instances offer a very affordable option for hosting a Docker-based micro-services architecture. Each micro instance can host several Docker containers.  For example, you may have a simple Node.js-based web application that you would like exposed as subdomain1.myhost.com and another Java/Tomcat webapp surfaced at subdomain2.myhost.com. Each could be hosted through a separate (and perhaps clustered) Docker container, with additional containers used for exposing API-services. The architecture might resemble:


Notice the use of HAProxy, which is being used in this instance as a load balancer and reverse proxy. It is being housed on its own micro-EC2 instance, and will direct inbound traffic to its destination based-upon subdomain routing rules (HAProxy supports a wide variety of routine rules, not unlike Apache mod_proxy).  Both DNS entries for subdomain1 and subdomain2 will direct traffic  to the same public IP address, which in this case is intercepted by the HAProxy. Configuration routing rules will then forward the inbound request to the appropriate Docker container that is hosting the web site.

Configuring HAProxy is very straightforward, which may explain its popularity within the open source community (learn more about HAProxy at http://www.haproxy.org/).  Let's look at an example HAProxy configuration file that would support the above architecture (haproxy.cfg is typically found at /etc/haproxy). We'll start with the two global and default sections, which you likely can leave "as-is" for most scenarios:

global
        maxconn 4096
        user haproxy
        group haproxy
        daemon
        log 127.0.0.1 local0 debug

defaults
        log     global
        mode    http
        option  httplog
        option  dontlognull
        retries 3
        option redispatch
        option http-server-close
        option forwardfor
        maxconn 2000
        timeout connect 5s
        timeout client  15min
        timeout server  15min

Next, we'll move on to the "frontend" section, which is used to describe a set of listening sockets accepting client connections and is used to configure the rules for the IP/port forwarding that will redirect traffic to an appropriate host for processing.

frontend public
        bind *:80

        # Define hosts
        acl host_subdomain1 hdr(host) -i subdomain1.myhost.com
        acl host_subdomain2 hdr(host) -i subdomain2.myhost.com

        ## figure out which one to use
        use_backend subdomain1 if host_subdomain1
        use_backend subdomain2 if host_subdomain2

The "bind" directive is used to indicate which port HAProxy will be listening (in this case, port 80). The "acl" directives define the criteria for how to route the inbound traffic. The first parameter that follows the directive is simply an internal name for future referencing, with the remainder of the parameters defining the methods used for matching some element of the inbound request that is being used as the basis for routing (the HAProxy docs provide more details). In this case, the first "acl" directive is simply stating that if the inbound request has a hostname of "subdomain1.myhost.com", then assign the match to acl identifier called "host_subdomain1". Basically, we are simply defining the criteria for matching the inbound request.

The next part of this section is the "use_backend" directive, which assigns the matching "acl" rule to a specific host for processing.  So, in the first example, it's saying that if the "acl" match name for the inbound request is assigned to "host_subdomain1", then use the backend identified by "subdomain1". Those "backends" are defined in the section that follows:

backend subdomain1
        option httpclose
        option forwardfor
        cookie JSESSIONID prefix
        server subdomain-1 someawshost.amazonaws.com:8080 check

backend subdomain2
        option httpclose
        option forwardfor
        cookie JSESSIONID prefix
        server subdomain-2 localhost:8080 check

In the first "backend" directive, we are defining the server backend used for processing that was identified through the assigned name "subdomain1" (these are just arbitrary names - just be sure to match what you have in the frontend directive).  The "server" directive (which uses an arbitrary name assignment as the first parameter) is then used to identify which host/port to forward the request, which in this case is the host someawshost.amazonaws.com:8080 (the check parameter is actually only relevant when using load balancing). You can have multiple server directives defined if you are using load balancing/clustering.

There are a multitude of configuration options available for HAProxy, but this simple example illustrates how easily you can use it as a reverse proxy, redirecting inbound traffic to its final destination.

APIs & Microservices


One of the challenges in devising a API solution that runs using microservices is how to "carve" up the various service calls so that they can hosted in separate Docker containers. Using the subdomain based approach (i.e., subdomain.myhost.com) I described earlier for standard web applications isn't really practical when you want to convey a uniform API to your development community. However, it can still be accomplished in much the same fashion using URL path-based reverse proxy rules. For example, consider these two fictitious API calls:

GET api.mycompany.com/contracts/{contractId}
GET api.mycompany.com/customers/{customerId}

In the first example, this is a RESTful GET call that retrieves a given contract JSON object based upon a contractId that was specified.  A similar pattern is used in example 2 for fetching a customer record. As you can see, the first path element is really the "domain" associated with the web service call. This could be used as a basis for separating those domains calls into their own separate microservice Docker container(s).  Once nice benefit to doing so is that one of those domains may typically experience more traffic than the other. By splitting them into separate services, you can perform targeted scaling.

If you enjoyed this article, please link to it accordingly.


Friday, February 13, 2015

Multi-Tier Architecture Tutorial using Docker

Background

While there are many very good Docker tutorials currently available, I found that many are either too simplistic in the scenarios offered, or in some cases, too complex for my liking. Thus, I decided to write my own tutorial that describes a multi-tier architecture configured using Docker.

Prerequisites

This tutorial assumes that you have successfully installed Git and Docker. I’m running Boot2Docker on a Mac, which enables Docker to be run nearly as though it were installed natively on the Mac (on the PC, Boot2Docker isn’t quite as straightforward). I assume some  basic level of familiarity with Docker (a good source of information is https://docs.docker.com/articles/basics/).

Scenario

The scenario I developed for purposes of this tutorial is depicted below:


As you can see, it involves multiple tiers:

MongoDB: This is our persistence layer that will be populated with some demo data representing customers. 

API Server: This tier represents Restful API services. It exposes the mongo data packaged as JSON (for purposes of this tutorial, it really doesn’t use any business logic as would normally be present).  This tier is developed in Java using Spring Web Services and Spring Data. 

WebClient: This is a really simple tier that demonstrates a web application written in Google’s Polymer UI framework. All of the business logic resides in Javascript, and a CORS tunnel is used to then access the API data from the services layer.

I’m not going to spend much time on the implementation of each tier, as it’s not really relevant for purposes of this Docker tutorial. I’ll touch on some of the code logic briefly just to set the context. Let’s begin by looking at how the persistence layer was configured.

MongoDB Configuration 

Note: The project code for this tier is located at: https://github.com/dajevu/docker-mongo.


Dockerhub contains an official image for mongo that we’ll use as our starting point (https://registry.hub.docker.com/u/dockerfile/mongodb/). In case we need to build upon what is installed in this image, I decided to clone the image by simply copying its Dockerfile (images can be either binary or declaratively via a text Dockerfile). Here’s the Dockerfile:


Line 5 identifies the base image used for the mongo installation - this being the official dockerfile/ubuntu image. Since no version was specified, we’re grabbing the latest.

Note: Comments in Dockerfiles start with #.

Line 8 begins the installation of the mongo database, along with some additional tools such s curl, git etc. Ubuntu’s apt-get is Ubuntu’s standard package management tool.

Lines 16 and 18 setup some mount points for where the mongo database files will reside (along with a git mount point in case we need it later). On line 21, we set the working directory to be that data mount point location (from line 16).

And lastly, we identify some ports that will need to be exposed by Mongo (lines 27 & 28).

Assuming you have grabbed the code from my git repository (https://github.com/dajevu/docker-mongo), you can launch launch this Docker image by running the script runDockerMongo.sh (in Windows Boot2Docker, you’ll need to fetch the code within the VM container that Docker is running on). That script simply contains the following:

docker run -t -d -p 27017:27017 --name mongodb jeffdavisco/mongodb mongod --rest --httpinterface --smallfiles

When run, it will use the Dockerfile present in the directory to launch the container. You can confirm it’s running by using the docker ps command:


 As you can see from the above, in this case it launched Mongo using container Id of 4fb383781949. Once you have the container Id, you can look at the container’s server logs using:

docker logs --tail="all" 4fb383781949 #container Id

If you don’t see any results from docker ps, that means that the container started but then exited immediately. Try issuing the command docker ps -a - this will identify the container Id of the failed service and you can then use docker logs to identify what went wrong. You will need to remove that container prior to launching a new one using docker rm .

Once the Mongo container is running, we can now populate it with some demo data that we’ll use for the API service layer. A directory called northwind-mongo-master is present in project files and it contains a script called mongo-import-remote.sh. Let’s look at the contents of this file:

This script simply runs through each .csv file present in the directory, and use the mongoimport utility to load up the collection. However, there is one little wrinkle. Since mongoimport is connecting to a remote mongo database, the IP address of the remote host is required, and this remote host is the mongo container that was just launched. How did I determine which IP address to use? If you are using Boot2Docker, you can simply run boot2docker ip - this will provide you the IP address of the Docker host you are using. If you are running directly within a host running Docker, you could connect via localhost as your IP address (since that port was exposed to the Docker host when we launched the container).

In order to load the test data, update that script so that it has the proper IP address for your environment. Then you can run the script (mongo-import-remote.sh), and it should populate the mongo database with the sample data. If you are using MongoHub, you can connect to the remote mongo host, and see the following collections available:


Fortunately, we don’t have to go through such hurdles on the remaining containers.

API Service Tier Configuration

The API service is a very simple Restful-based web service that simply exposes some of the mongo data in a JSON-format (granted, you can access mongo directly through it’s restful API, but in most real-world scenarios, you’d never expose that publicly).  The web application, written in Java Spring, uses the Spring Data library to access the remote mongo database. 

The project files for this tier are located at: https://github.com/dajevu/docker-maven-tomcat. While I won’t cover all of the Spring configuration/setup (after all, this isn’t a Spring demo), let’s briefly look at the main service class that will have an exposed web service:


Using the Spring annotations for Spring web services, we annotate this controller in line 5 so that Spring can expose the subsequent services using the base URL /customer. Then, we define one method that is used to expose all of the customer data from the Mongo collection. The CustomerDAO class contains the logic for interfacing with Mongo. 

Let’s look at the Dockerfile used for running this web service (using Jetty as the web server):


As you can see, in line 2 we’re identifying the base image for the API services as Java 7 image. Similar to the mongo Dockerfile, the next thing we do in lines 8-15 is install the various required dependencies such as such git, maven and the mongo client.  

Then, unlike with our mongo Dockerfile, we use git to install our Java web application. This is done in lines 21 thru 26. We create a location for our source files, then install them using git clone. Lastly, in line 28, we the shell script called run.sh. Let’s take a look at that scripts contents:

#!/bin/bash

echo `env`

mvn jetty:run

As you can see, it’s pretty minimal. We first echo the environment variables from this container so that, for troubleshooting purposes, can see them when checking the docker logs. Then, we simply launch the web application using mvn jetty:run. Since the application’s source code was already downloaded via git clone, maven will automatically compile the webapp and then launch the jetty web server.

Now, you maybe wondering, how does the web service know how to connect to the Mongo database? While we exposed the Mongo database port to the docker host, how is the connection defined within the java app so that it points to the correct location. This is done by using the environment variables automatically created when you specify a dependency/link between two containers. To get an understanding of how this is accomplished, let’s look at the startup script used to launch the container, runDockerMaven.sh:

docker run -d --name tomcat-maven -p 8080:8080 
\ —link mongodb:mongodb jeffdavisco/tomcat-maven:latest 
\ /local/git/docker-maven-tomcat/run.sh

As you can see, the -link option is used to notify docker that this container has a dependency an another container, in this case, our Mongo instance. When present, the -link option will create a set of environment variables that get populated when the container is started. Let’s examine what those environment variables look like by examining with the docker logs command (remember, before you can launch this container, the mongo container must first be running):

MONGODB_PORT_28017_TCP_PROTO=tcp 
HOSTNAME=f81d981f5e9e 
MONGODB_NAME=/tomcat-maven/mongodb 
MONGODB_PORT_27017_TCP=tcp://172.17.0.2:27017 
MONGODB_PORT_28017_TCP_PORT=28017 
MONGODB_PORT=tcp://172.17.0.2:27017 
MONGODB_PORT_27017_TCP_PORT=27017 
PATH=/usr/local/sbin:/usr/local/bin:/usr/sbin:/usr/bin:/sbin:/bin 
PWD=/local/git/docker-maven-tomcat 
MONGODB_PORT_27017_TCP_PROTO=tcp 
JAVA_HOME=/usr/lib/jvm/java-7-oracle MONGODB_PORT_28017_TCP_ADDR=172.17.0.2 MONGODB_PORT_28017_TCP=tcp://172.17.0.2:28017 
MONGODB_PORT_27017_TCP_ADDR=172.17.0.2

The environment variables starting with MONGODB represent those created through the link. How did it know to prefix was MONGODB? That’s simply because, when we launched the mongo container, we specified the optional —name parameter that provided a name alias for that container. 

Now, how is that incorporated into the API service? When we define the Spring Data properties for accessing mongo, we specify that an environment variable is used to identify the host. This is done in the spring-data.xml file (located under src/main/resources in the project code). 

   
                   threads-allowed-to-block-for-connection-multiplier="4"
                   connect-timeout="1000"
                   max-wait-time="1500"
                   auto-connect-retry="true"
                   socket-keep-alive="true"
                   socket-timeout="1500"
                   slave-ok="true"
                   write-number="1"
                   write-timeout="0"
                   write-fsync="true" />


So, when we startup the container, all that is required is to launch it using runDockerMaven.sh. Let’s confirm that the service is working by accessing the service via the browser using:

http://192.168.59.103:8080/service/customer/

In your environment, if you are using Boot2Docker, run boot2docker ip to identify the IP address in which the service is exposed. If running directly on a docker host, you should be able to specify localhost. This should bring back some JSON customer data such as: 


Now, let’s look at the last of the containers, the one used for exposing the data via a web page. 

Web Application Tier

The web application tier is comprised of a lightweight Python web server that just serves up a static HTML page along with corresponding Javascript.  The page uses Google’s Polymer UI framework for displaying the customer results to the browser. In order to permit Polymer to communicate directly with the API service, CORS was configured on on the API server to permit the inbound requests (I wanted to keep the web app tier as lightweight as possible).

Note: The source code/project files for this tier can be found at: https://github.com/dajevu/docker-python

Here is the relevant piece of code from the Javascript for making the remote call:


Obviously, the VMHOST value present in the url property isn’t a valid domain name. Instead, when the Docker container is launched, it will replace that value with the actual IP of the API server.  Before we get into the details of this, let’s first examine the Dockerfile used for the Python server:


This Dockerfile is quite similar to the others we’ve been using. Like the mongo container, this one is based on the official ubuntu image. We then specify in lines 11-14 that Python and related libraries are loaded. In line 23-24, we prepare a directory for the git source code. We follow that up by then fetching the code using git clone in line 27, and then set our working directory to that location (line 28). (the CMD command in line 31 is actually ignored because we specify in the launch script which command to run (i.e., it overrides what is in the Dockerfile).

Let’s look at the startup script now used to launch our container:

docker run -d -e VMHOST=192.168.59.103 --name python -p 8000:8000 \ 
--link tomcat-maven:tomcat jeffdavisco/polymer-python:latest \
/local/git/docker-python/run.sh

A couple of things to note in the above. Notice how I’m passing the IP address of my Boot2Docker instance using the environment flag -e VMHOST=192.168.59.103. Similar to what we needed to do when configuring the API service tier, you will have to modify this for your environment (if using Boot2Docker, run boot2docker ip to find the IP address of your docker host, or if running natively on Linux, you can use localhost). Notice the other thing we are doing is exposing port 8000, which is where our Python web server will be running under. Lastly, we are instructing the docker container to run the run.sh shell script. We’ll look at this next.

The run.sh script contains the following:

#!/bin/bash

# replace placeholder with actual docker host
sed -i "s/VMHOST/$VMHOST/g" post-service/post-service.html

python -m SimpleHTTPServer 8000

The sed command is used for replacing that VMHOST placeholder token with the environment variable passed to the docker container when it was launched ($VMHOST). Once the html file has been updated, we then launch the python server using the command python -m SimpleHTTPServer 8000. After running the startup script, if everything went well, you should de able to then visit in your browser: http://:8000 (where dockeriphost is equal to your boot2docker ip address, or local docker host if on Linux).  You should see something like: 


You've now completed the tutorial! You have a docker container running mongo; another running an API service; and the last running simple web service.

I hope you've enjoyed this tutorial, and I hope to have a follow-up to it shortly describing how these the contains can be more easily managed using fig (learn more at: http://www.fig.sh/).

Monday, April 15, 2013

Using Force.com REST API's with Google Dart

INTRODUCTION


Salesforce's Force.com platform is an incredibly powerful solution for building enterprise web applications. However, using Force.com's native VisualForce pages is not aways an attractive solution for creating full-featured interfaces since you are required to host those pages within the Force.com platform.

Fortunately, nearly all of Force.com's capabilities are exposed through their extensive API, including custom objects and apex-code that is annotated as a web service. In this post, I will demonstrate how to use the Force.com RESTful APIs to build a simple web application using Google's new Dart language. 

Dart represents the next generation in building enterprise calibre web applications. While similar in syntax to Java or C#, it still contains many of the most powerful features found in Javascript, such as its asynchronous programming model and treatment of functions as first-class objects. In many respects, it blends the most powerful features of Java and Javascript, while sprinkling in sugar such as integrated unit testing support; DOM-based query and manipulation features like jQuery provides; and, interestingly, can be written for both client and server-side applications (not unlike Javascript and node.js). 

For those of you unfamiliar with Dart, it uses a similar model to Google's GWT. That is, the code you write for client-side browser applications is compiled into Javascript for run-time deployment.  Dart's compilation process deals with the complexity of creating the proper native Javascript for each of the major browsers.  In addition, Google provides a very nice Eclipse-based IDE for development, and a special version of Chrome called Dartium that enables Dart code to be run natively without the Javascript compilation process being required (very handy for rapid development). Because Dart is compiled into Javascript for deployment, it optimizes the Javascript code produced, so that only the exact code needed to run the application is actually getting generated (called "tree shaking" by the Dart folks).

NOTE: The code for this article can be found at: https://github.com/dajevu/sfdc-dart

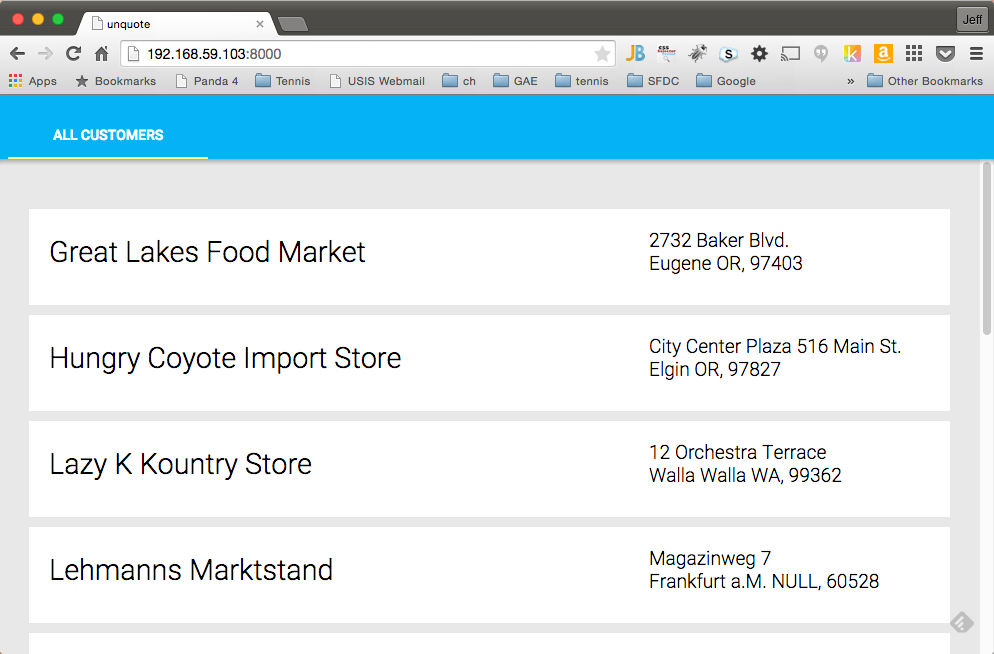
The application we'll be creating is really pretty simple -- it's a single webpage with tabs used for listing Salesforce Accounts and User objects.  Here's an example of what it looks like:


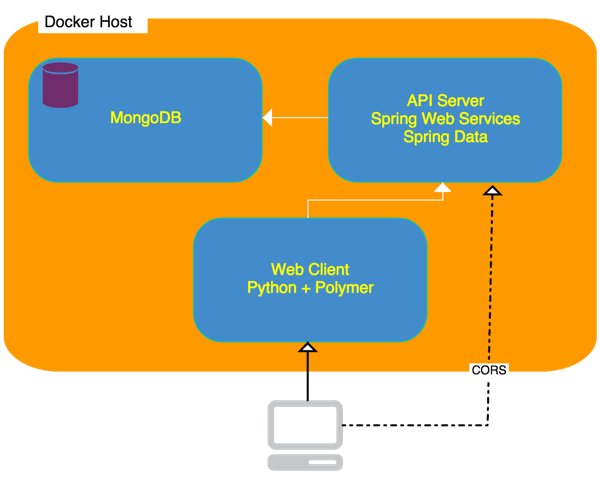
Since it's currently not possible to invoke the Salesforce API's directly within a web page unless hosting the page through the Force.com infrastructure (due to cross-domain Javascript restrictions), a server component (also written in Dart) is used to proxy the client requests to Salesforce. The graphic below is a high-level overview of the solution:


This sample project includes both the Dart server and client components.

PREREQUISITES


In order to run this application, you'll need at least a Force.com developers account (which is free),  and Dart version 0.4.3.5 or greater (it may work on earlier versions as well, but I didn't test it). You can download the Dart SDK, IDE and Dartium at Dart's website.

SETUP


For security reasons, your instance of Salesforce will need to be setup to allow outside RESTful API calls to be placed. The steps required are outlined in detail at http://www.salesforce.com/us/developer/docs/api_rest/. However, if you are too impatient to follow that explanation (and many of the authentication steps described are only applicable for those using OAuth, which we're not using in this example), what you must do is configure your Salesforce instance for remote access. This is done via the Setup->Develop->Remote Access configuration page, shown below:

After entering all of the required values, you will be provided a consumer key and consumer password, as shown above. When using the force.com API, you can authenticate using either OAuth or via the token/session id. We're using the later in this example.

LOGGING INTO SALESFORCE USING REST


Before we jump into the Dart code and samples, let's first examine how to use the Salesforce's API from the command line. Before we begin placing calls to access the the remote objects, a session or token must be first acquired. Below illustrates how this is done using curl from the command line (broken up into multiple lines for purposes of explanation):

curl -d "grant_type=password&
   client_id=3[consumer-key]&
   client_secret=[consumer-secret]&
   username=[sfdc-login-email-address]&
   password=[sfdc-login-password]"   

In your case, you'll be replacing the values found within the [ ] with those appropriate to your environment. The [consumer-key] and [consumer-secret] are those values captured from the previous screenshot/form.  The other two values represent the regular salesforce.com username and password used to login to salesforce, and similarly for the login URL (notice I'm using a sandbox instance of salesforce, hence it begins with test.).

After invoking the command, you should see a JSON response that resembles:

{
  "id" : "https://test.salesforce.com/id/00DT6EAM/005i000AA",
  "issued_at" : "1365989902442",
  "instance_url" : "https://cs15.salesforce.com",
  "signature" : "GVY9jxn/2Y+gAfewy6rq+l2DAqRza5A8U4g=",
  "access_token" : "[not shown]"
}

The two values that are most relavent are the instance_url, which is the URL location where subsequent calls must be placed, and the access_token, which represent the session id that is also used on subsequent calls (the access_token will remain active for only a few hours after which a new one must be acquired). 

Now that we have the required login credentials, we can place some API calls to retrieve back data from the Salesforce instance. For example, let's place a call to retrieve back some data from the Account object (NOTE: use single quotes around authorization header, as shown below following -H flag). 

curl [instance_url]/services/data/v27.0/query?q=SELECT+id,name,type,description,industry+FROM+account+ORDER+BY+name -H 'Authorization: Bearer [access_token]'

In this example, a GET request is being issued that runs a SQL-type select statement against the Account object in Salesforce. In this case, I'm bringing back the type, description and industry properties from the Account table and ordering the results by the name property. Here's an example of the JSON that is returned:

{
  "totalSize" : 2,
  "done" : true,
  "records" : [
    {
      "attributes" : {
        "type" : "Account",
        "url" : "/services/data/v27.0/sobjects/Account/001e00000GAMYAA4"
      },
      "Id" : "001e0000006GAMYAA4",
      "Name" : "Acme Child Corporation",
      "Type" : "Customer",
      "Description" : "Acme Child is a child of Acme Parent.",
      "Industry" : "Consulting"
    },
    {
      "attributes" : {
        "type" : "Account",
        "url" : "/services/data/v27.0/sobjects/Account/001e0005prfhAAA"
      },
      "Id" : "001e0000005prfhAAA",
      "Name" : "Acme Corporation Parent",
      "Type" : "Customer",
      "Description" : "Description",
      "Industry" : "Insurance"
    }
  ]
}

Now that you have a flavor of how the Salesforce API works, let's dig into Dart.

SERVER-SIDE DART


While you maybe getting pretty excited about the prospect of using the Salesforce API directly from within Javascript on the client, this unfortunately is not possible due to the restrictions found in Javascript when calling AJAX calls from a remote server (cross-domain scripting). Of course, you can build and deploy pages directly within the Force.com infrastructure (i.e., VisualForce pages), but this requires hosting your pages in their instance. While there are some work-arounds (CORS), they remain a bit kludgy (although the Dart sample code for this project illustrates supporting CORS in the Dart server that is used). 

To get around this issue for our example, we'll use server-side Dart as a proxy type service to remotely call the Salesforce API as well as serve up our web application. Using Dart on the server-side is very attractive, as it means that a single language can be used to both develop the backend and front-end portions of our application. This no doubt helps explain why node.js is becoming so popular -- it supports the ability to program server-side applications using Javascript.

While I really don't want to personally argue over the merits of using Javascript, I personally find the language less than ideal, especially coming from a Java background. Understanding how prototypes work as a replacement to classes/inheritance remains somewhat murky for me as, and its heavy use of asynchronous callbacks can create some rather unwieldy code. Dart, in my opinion, marries the best features of Javascript with those of Java. In particular, Dart likewise heavily relies on an asynchronous model, but it deals with its complexity by using a concept known as Futures (granted, there are some similar implements with Javascript, but it's not native). 

Let's examine how we can use Dart to proxy service calls to Salesforce. The first thing we must do is setup a Dart program that will act as a web server. This is accomplished using the Dart:io library. Since we also want to use the server to serve-up web pages and their artifacts (css files, images etc), we need to first instruct the server where to locate these files (setting up a Dart server is a pretty low-level exercise, as you'll see here -- there are some external packages that simplify these steps). This identification is done within the main() method of the server code found in the server.dart file (like Java, a Dart program is invoked through a main method):

main() {
  // Compute base path for the request based on the 
  // location of the script and then start the server.

  File script = new File(new Options().script);
  script.directory().then((Directory d) {
    startServer(d.path.substring(0
    d.path.lastIndexOf('bin')) + 'web/');
  });
}

To be honest, I'm not 100% sure how the Options().script method identifies the local path/directory where the server is running from, but I didn't concern myself overly with such details, as this is a common use pattern.  In this code, we witness our first use of a callback, which can be easily identified as in use via the shorthand then method. In this example, the code states that after the script method is invoked, we're provided a Directory object that we can use to acquire the path location where the server is running. In this case, the server code is running in the bin subdirectory, but I've split apart my web application artifacts into another directory at the same level as bin called web, which I'm simply replacing for bin via the substring method.

Now that I have the location where my web artifacts reside (web), I can then run the method that will actually start the server. Appropriately enough, it's in the startServer method, to which I'm passing the directory path we acquired.  Let's take a look at the startServer method:

startServer(String basePath) {

  HttpServer.bind('127.0.0.1', 9090).then((server) {
    
    print('Server started, Port 9090');
    print('Basepath for content is: ' + basePath);
    
    server.listen((HttpRequest request) {
      print("Received " + request.method + " request, 
             url is: " + request.uri.path);
      
      switch (request.method) {
        case "GET"
          if (request.uri.path.contains('api'))
            handleApi(request, basePath); 
          else
            handleGet(request, basePath);
          break;
        case "POST"
          //handlePost(request); not yet implemented
          break;
        case "OPTIONS"
          handleOptions(request);
          break;
      }  
    });
  });
}

As you can likely discern, the HttpServer.bind static method is used to initiate the web server under localhost port 9090. Once binded, an HttpServer object is assigned to the variable server, and in turn, it begins listening for inbound connections. Once an inbound connection is received, it is routed to other methods for processing based upon a) the inbound connection's HTTP method (i.e., GET, POST etc) and b) in the case of a GET, it is further routed based upon whether the request URL contains "api" or not. 

Before we examine the handleApi method, which is where we invoke the various Salesforce API calls, let's first explore how we can call a RESTful API using Dart's IO library (the io library, by the way, can only be used server-side with Dart, since it includes calls to the local filesystem etc).

PLACING RESTFUL CALLS WITH DART's IO LIBRARY


In this project, we're returning back a list of Accounts and Users from Salesforce.com. Eventually we'll display those lists within a web page. For each of these two object types, I created a separate class that contains both the logic required to place the API call as well some unit tests. Let's look at the Dart Account class (found in bin/classes/account.dart file):

class Account {
  
   static Future getAllAccounts(String sessionId, String host) {
     
     Completer accntResponse = new Completer();
     
     Future reply = 
        SFDCUtils.getRequest('${host}${Constants.QUERY}${Constants.QUERY_ACCOUNT_ALL}'
        sessionId);

     reply.then( (JsonObject response) {
       accntResponse.complete(response);
     });
     
     return accntResponse.future;
   }
}

The first thing to note is that the getAllAccounts method returns a Future object of type JsonObject. What this means is that this method represents an asynchronous call, and when the method is completed, it will notify the calling code accordingly. In other words, it represents a promise that a value will eventually be returned, when processing is completed. Since we are calling an external service, this is sensible approach. However, this code doesn't provide any real insight into how the Salesforce API is invoked, as this logic takes place within the SFDCUtils.getRequest static method. Let's take a look at that code:

  static Future getRequest(String url, String sessionId, 
    [String contentType = Constants.CT_JSON]) {
    
    HttpClient client = new HttpClient();
    
    Completer respBody = new Completer();

    var requestUri = new Uri.fromString(url);
    
    var conn = client.getUrl(requestUri);
    
    conn.then ((HttpClientRequest request) {
      request.headers.add(HttpHeaders.CONTENT_TYPE, contentType);
      request.headers.add('Authorization', 'Bearer ${sessionId}');
      request.close(); 
      request.response.then( (response) {
        
        IOUtil.readAsString(response, onError: null).then((body) {         
          
          respBody.complete(new JsonObject.fromJsonString(body));
        
          client.close();
        });        
      });      
    });    
    return respBody.future;
  }

This could be considered a "helper" method that can be used for any of the GET requests to Salesforce (a similar helper is provided for POST requests, but not covered here). The first thing that we do is to get an instance of Dart:IO's HttpClient. We then follow it by creating an HttpClientRequest object invoking the getUrl method on the client object. With that, we can then setup the required HTTP header used for the Salesforce authentication (we'll see in a bit how the sessionId is first acquired) as well as for specifying the content type (unless provided as an optional parameter to the method, it's set to "application/json"). Lastly, we then invoke the HTTP request asynchronously and wait until the response is received. Once received, an external library is used (IOUtil) to convert the response Stream into a String, represented by the body variable. Lastly, we close the HttpClientRequest using its close method.

So, to circle back to the Account class' getAllAccounts method, once the helper has returned the JSON results from the HTTP, it indicates processing is completed by invoking the complete method on the Future response object.

One thing I haven't discussed yet is the use of the JsonObject. When the response JSON is returned from Salesforce, it is converted to this JsonObject (note -- this functionality is provided via a third-party utility). This object represents a map of the returned JSON, and allows for convenient dot-notation access to the JSON values. We can see this at play first-hand in the accompanying unit test for Account, which we'll discuss next.

UNIT TESTING WITH DART


One of the nicest features of Dart is its built-in support for unit testing (for a more detailed understanding, see this article). The account.dart file, in addition to defining the class and methods for the Account, also contains a main() method that can be invoked to run one or more unit tests.  Below is a unit test to exercise the getAllAccounts method:

  test('Account', () {
    Future url = Credential.getCredentials();
    
    url.then((JsonObject obj) {
      
      String tokenId = obj.access_token;
      String host = obj.instance_url;
      
      Future accnts = Account.getAllAccounts(tokenId, host);
      
      accnts.then((JsonObject jsonObj) {
        expect(jsonObj.totalSize > 0, true);
      });
    });
  }); 

As you can see, the first thing we do is to use the Credential class' getCredentials static method to return the credentials used to login to Salesforce (the Credential class is very similar to Account, so I don't bother covering it here). Once the instance_url and access_token are returned by the getCredentials call, we use those as parameters to invoke the getAllAccounts method. As you may recall, the JSON returned from the Salesforce API contains a totalSize property that identifies how many records are returned. We use Dart's expect method in a similar fashion to jUnit's assert to determine whether the test was successful or not. When running in the Dart IDE, you'll see something like this in the console window indicating the test successfully passed.

unittest-suite-wait-for-done
request url is: https://test.salesforce.com//services/oauth2/token
PASS: Account

All 1 tests passed.
unittest-suite-success

Now that we've seen how the Salesforce API is invoked and the corresponding data returned, let's tie that into the server to see how the proxy functionality works. 

IMPLEMENTING PROXY FUNCTIONALITY IN DART SERVER


If you recall, when a GET HTTP request is issued to the Dart server (found in the file server.dart), if the URL of that request contains "api", the handleApi method is invoked. Let's now examine this method to see how the proxy functionality is implemented:

handleApi (HttpRequest request, String basePath) {
  
  HttpResponse res = request.response;
  addCorsHeaders(request, res);
  
  _getSessionId().then((Map credentials) {
    sfdcCredentials = credentials;
    
    switch (request.uri.path) {

      case '/api/accounts':
          Future accnts = 
             Account.getAllAccounts(sfdcCredentials['access_token'], 
             sfdcCredentials['instance_url']);
          
          accnts.then((JsonObject jsonObj) {
            res.write(jsonObj.toString());
            res.close();
          });
          break;

      case '/api/users':          
          Future orders = 
             User.getAllUsers(sfdcCredentials['access_token'], 
             sfdcCredentials['instance_url']);
          
          orders.then((JsonObject jsonObj) {
            res.write(jsonObj.toString());
            res.close();
          });
          break;
      }
  });  
}

As you can see, it's pretty straightforward. The HttpRequest object's uri path (URL) is extracted and then used as the basis for the switch statement that follows. If, for example, the inbound GET URL contains the prefix of "/api/accounts", then a list of of Account objects is returned wrapped within a JsonObject map. The results are then returned to the calling client as a JSON string.  We follow an identical approach with the "/api/users" call.  Most of the real work was offloaded to the individual Dart classes such as Account

NOTE: CORS supported was added to the server (see the method addCorsHeaders), so cross-domain Javascript support is available. To read more on how it's implemented with Dart, see this article

Now that we've got the proxy server completed, we can dive into how the UI is developed within Dart.

CLIENT-SIDE DART


The initial screenshot provided at the start of this article depicted the UI we'll be creating. As a quick refresher, it's just a web page with two tabs -- one to display a list of Salesforce Accounts, and the other tab Users. Let's begin by looking at a snippet of the HTML used to construct the page (sfdcdemo.html):

The design for the page uses Twitter Bootstrap for the CSS layout, and the new Dart UI Widgets library, which mirrors the Javascript functionality provided in Twitter Bootstrap, for the widget support. In this example, we're using the tab widget, which is implemented by way of the custom HTML Dart tag introduced called <x-tabs>(for more information on creating custom Dart tags, see this article).  As we will see in a moment, the Dart client code interacts with the above HTML by way of the id values assigned to some of the HTML elements. For example, when the list of Accounts is populated by Dart, it simply appends the tabular data to the table identified by the element id named accounttable. In this fashion, Dart's query method works similarly to jQuery.

Let's take a look at the fragment of Dart client code that corresponds to this HTML (sfdcdemo.dart) that is used for populating the Accounts tab.
When the page is first opened, the main method in sfdcdemo.dart invokes the populateAccountsTable method shown above.  The first thing that is done is to invoke an Ajax request to the server API proxy method we described previously (obviously, in a production type environment, the host wouldn't be hard-coded as above).  Once the results of the call are returned, a JsonObject is populated with the data, and then we simply iterate through the results to dynamically construct the HTML table body. Once the HTML is constructed, we use  Dart's query mechanism to locate the target element id in the DOM, and then append the new dynamic HTML results. Couldn't be much easier!

The sfdcdemo.dart file also contains a method called populateUsersTable, and it's used to populate the User tab in the HTML. It follows an identical pattern as populateAccountsTable.

The easiest way to run this project is to a) open the project in the Dart IDE and b) right-click on the sfdcdemo.html file and select "Run in Dartium". Of course, you will first need to follow the steps outline in the pre-requisites and setup sections.

In a future posting, I hope to replace the existing HttpClient mechanism on the Dart client for placing the AJAX calls to populate the tabular data with web sockets.